Wednesday, August 1, 2012
Tuesday, July 31, 2012
Salsa
We had weekend guests Friday evening to Sunday, so I did not finish my back hall. However, I canned salsa before I mad the poppers on Friday. I do not know how it tastes later in the year after being "canned" a few months, so I am not going to post the recipe yet. I do know that it was very good right before it was ladled into the jars :)


On another note, I changed out the three light fixtures in the back hall and almost finished the trim touch up on the floor. Pics tomorrow....... (if my new photographer is available).
Sunday, July 29, 2012
Jalapeno Poppers
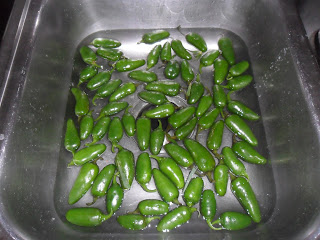
Friday afternoon I made 100 jalapeno pepper poppers, or as I call them "half poppers." I also made salsa but that's another post. I planted nine plants this spring, so I would have plenty peppers to make these poppers to put in the freezer to enjoy on the weekends this winter. They can be fairly expensive from the grocery store and even more so when you order them out. In fact, we were out to dinner last night at our favorite local pub and they were on the nightly "specials" list for $4.95 for five whole poppers. Even though mine are half-poppers I probably use twice as much cheese that you would get in a whole one.
I used a base recipe that I found here and I modified it a little. I did not use bacon bits, but I added a little garlic and onion powder. You can really modify it to your liking as long as your ratio of cream cheese to a drier cheese is appropriate for molding. If you do not have enough cream cheese then it is difficult to keep the mixture together enough to stay in the jalapeno half. Also, since my peppers were homegrown without chemicals in Ohio, they were smaller than what you would may find in your supermarket. This means that I used more peppers, about 25 per recipe instead of the listed 12. (I doubled the recipe since I had 50 peppers to use.)
MY RECIPE INGREDIENTS: 50 small jalapeno peppers, 16 oz. cream cheese (2 blocks), 12 oz. (3 cups) sharp cheddar cheese, 1 tsp. garlic powder, 1 tsp. onion powder, 2 cups milk (for dipping), 2+ cups flour (for rolling), 2+ cups bread crumbs, oil for when you are ready to fry
Step 1: Put on latex or kitchen gloves!!! You will regret this if you do not wear gloves the entire time.
Step 2: Wash your peppers.
 Step 3: Cut off the top, cut in half lengthwise, and remove seeds.
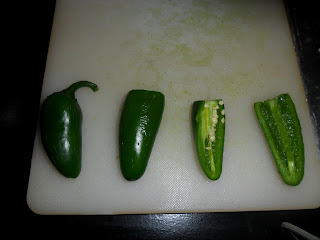
Step 4: Stuff your pepper halves with the cheese mixture.

Step 5: Dip into milk, roll in the flower, then place on plate to dry for 10 minutes.

Step 6: Dip into milk, roll in the breadcrumbs (I used seasoned), then place on plate to dry 10 minutes.

Step 7: Place in one layer in freezer bags set on cookie sheet and put in freezer. Once they are frozen you can remove the cookie sheet.
I used a base recipe that I found here and I modified it a little. I did not use bacon bits, but I added a little garlic and onion powder. You can really modify it to your liking as long as your ratio of cream cheese to a drier cheese is appropriate for molding. If you do not have enough cream cheese then it is difficult to keep the mixture together enough to stay in the jalapeno half. Also, since my peppers were homegrown without chemicals in Ohio, they were smaller than what you would may find in your supermarket. This means that I used more peppers, about 25 per recipe instead of the listed 12. (I doubled the recipe since I had 50 peppers to use.)
MY RECIPE INGREDIENTS: 50 small jalapeno peppers, 16 oz. cream cheese (2 blocks), 12 oz. (3 cups) sharp cheddar cheese, 1 tsp. garlic powder, 1 tsp. onion powder, 2 cups milk (for dipping), 2+ cups flour (for rolling), 2+ cups bread crumbs, oil for when you are ready to fry
Step 1: Put on latex or kitchen gloves!!! You will regret this if you do not wear gloves the entire time.
Step 2: Wash your peppers.


Step 4: Stuff your pepper halves with the cheese mixture.

Step 5: Dip into milk, roll in the flower, then place on plate to dry for 10 minutes.

Step 6: Dip into milk, roll in the breadcrumbs (I used seasoned), then place on plate to dry 10 minutes.

Step 7: Place in one layer in freezer bags set on cookie sheet and put in freezer. Once they are frozen you can remove the cookie sheet.
Step 8: When you're ready for a snack, remove as many as you are in the mood for and fry at 365 °F. Even if you want to eat them right away, I would freeze them first to harden up the cheese enough to withstand the heat of the oil (preventing premature oozing).
Thursday, July 26, 2012
Painted Floor
I have been up for two hours but cannot seem to get started on the final day of my hall floor. It has not been an easy task. This on-the-surface "easy" hall makeover has taken forever! Here is what has been done.
1. The stinky carpet was removed before we moved in 18 months ago. This revealed a Masonite and linoleum mix with about 500 nails embedded in it.
2. All Masonite and lino was removed. This revealed floor repairs (and cuts from when plumbing and HVAC was installed) and a few holes in the turn-of-the-century pine floor (this is in the addition, not the original 1849 portion).
3. I repaired and replaced the wood, This left it a little better looking, but still not good enough to sand and stain. And, there had been a border painted at some point before 1966 (when the former sitting room was turned into a bathroom and hall), and I am pretty sure it has lead in it. So that means no sanding for refinishing.
4. I then did all of my painting: ceiling, trim, and wall. I also coated the two sets of sliding closet doors (one for a panty the other is a coat closet) with Minwax Polyshades to freshen them up without painting them.
5. The three lights I bought were too big for the space, so back they go and I purchased a discount version of some schoolhouse lights from Lowe's. I cannot put them up until this weekend, because I realized I need another coat of ceiling paint and my brand is out-of-stock until Friday evening!
6.Back to the floor.....I decided paint would be the answer as it is still very sturdy pine over a sturdy sub-floor. If it looks that terrible I will have someone come in and tile it. I cleaned it with a weak Murphy's oil/water mix and scrub brush. I took it easy on the water and wiped well as I went. (The wood was soooo dirty.)
7. I then painted the entire floor with Kilz primer (the gold label) and let it dry overnight.
8. I then painted with Sherwin Williams porch and floor paint in grizzly gray. It is water-based and low-odor. It went on like a dream.
9. Today is the final coat of floor pain and trim touch ups. Then I can paint ceiling again, nstall lights, and put new doorbell in (which is located in the hall).
Hopefully I will have pics up on Monday!!!
Wednesday, July 25, 2012
Decor "Copies"
I am taking a break from painting the back hall floor (primed and first coat) and came across this pin from one of my FB friends, http://knockoffdecor.com. It is a great site that "copies" some of your favorite (but sometimes expensive) decor items. There are loads and loads of projects. This is one that copies Pottery Barn's $499 barn floor mirror that I personally am going to try (as soon as I get some more tools), http://homastyle.com/wp/2012/06/28/floor-mirror/
Check back for the completed back hall before-and-after pics.
Check back for the completed back hall before-and-after pics.
Tuesday, July 24, 2012
Canning Pizza Sauce
Yesterday, I made seven pints of homemade pizza sauce. It's a little bit of work, but goes quickly if you get organized before you start. I fill my canner with water, get all of my jars, lids, and tops (one extra than the recipe calls for just in case), bowls, etc., etc. out and ready before I peel one tomato.
This recipe called for 20 lbs. of tomatoes, any kind. I like to use mostly Roma when making sauces as they tend to be less watery. However, many of my Romas were zapped during our heat wave earlier this month. So, I used a variety of tomatoes from the garden.
 I used the directions in this canning recipe. This lady does a great job with directions for preserving just about any kind of vegetable or fruit. She also lists local farms to pick you own or already picked. The home page is http://www.pickyourown.org

I used the recipe as it was written, including the salt. I used a little celery seed instead of the optional celery. If you decide to use this recipe, or any cooked tomato recipe for canning, do not be tempted to over season with onions, garlic, or fresh herbs...they can become bitter. I usually "tweak" the sauce when I get ready to use it. I have used it 'as is,' with a little sugar, canned tomato sauce, and meat over pasta, and with other fresh veggies cooked into it. But, it is a good base sauce....I used it last year and wish I had made more.
This recipe called for 20 lbs. of tomatoes, any kind. I like to use mostly Roma when making sauces as they tend to be less watery. However, many of my Romas were zapped during our heat wave earlier this month. So, I used a variety of tomatoes from the garden.


I used the recipe as it was written, including the salt. I used a little celery seed instead of the optional celery. If you decide to use this recipe, or any cooked tomato recipe for canning, do not be tempted to over season with onions, garlic, or fresh herbs...they can become bitter. I usually "tweak" the sauce when I get ready to use it. I have used it 'as is,' with a little sugar, canned tomato sauce, and meat over pasta, and with other fresh veggies cooked into it. But, it is a good base sauce....I used it last year and wish I had made more.
Monday, July 23, 2012
Bedroom Makeover
Besides writing about my projects and garden, I am constantly looking for others' pics and stories about their own projects. Home Stories A2Z is one of my faves that I check several times a week for inspiration. Every time I visit, I see something new or something that I didn't see on previous visits. Today, Beth posted before and after pics of hers boys' room makeover. Take a peek......it's pretty cool!
http://www.homestoriesatoz.com/2012/07/sherwin-williams-rainstorm-boys-room-reveal-giveaway.html
http://www.homestoriesatoz.com/2012/07/sherwin-williams-rainstorm-boys-room-reveal-giveaway.html
Subscribe to:
Posts (Atom)